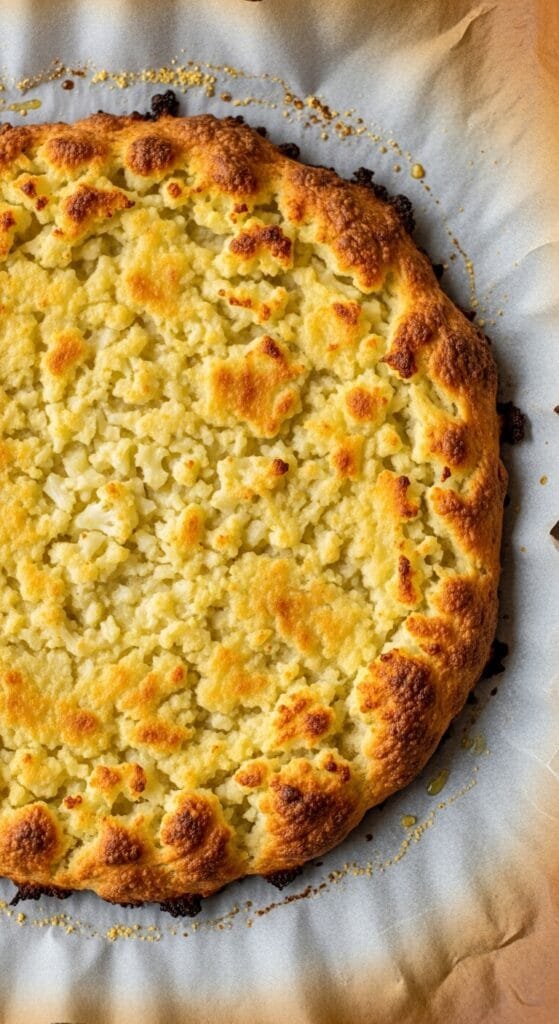
This Cauliflower Pizza Crust offers a simple way to enjoy a lighter, vegetable-based base that still bakes firm and golden. The ingredients are familiar, the steps are easy to follow, and the crust turns crisp around the edges when prepared properly. It’s a flexible option for pizza night, appetizers, or a customizable family meal.

Disclosure: This post may contain affiliate links. If you make a purchase, I may earn a small commission at no extra cost to you.
Why You’ll Love This Cauliflower Pizza Crust
This crust works well because it bakes firm, holds toppings easily, and has a mild flavor that blends with classic or creative combinations. The ingredients stay simple, and the steps are clear enough for weeknight cooking.
. It bakes with a crisp exterior and a sturdy center as long as the cauliflower is dried well. The clean ingredient list and quick method make it a go-to option for anyone wanting a vegetable-based crust without complicating the process
What You’ll Need
You only need a few simple ingredients to make this crust.
Ingredients
- Cauliflower: Fresh or frozen works (riced is best).
- Eggs: To bind everything together.
- Cheese: Mozzarella and Parmesan for flavor and structure.
- Seasonings: Garlic powder, dried oregano, salt, and pepper.
Optional Add-ins:
- Fresh basil or parsley (chopped)
- Red pepper flakes (for a little kick)
Dairy-Free / Vegan Options:
- Use flax eggs instead of regular eggs (1 tbsp ground flax + 2.5 tbsp water per egg).
- Use dairy-free cheese or skip cheese and add a bit more almond flour as a binder.
To make Easy Cauliflower Pizza Crust, you will need:
- Oven: For baking the pizza crust
- Microwave: To heat the riced cauliflower.
- Baking sheet: A flat baking sheet is essential for baking the pizza crust.
- Parchment paper: To prevent the crust from sticking to the baking sheet.
- Food processor or blender: To finely chop the cauliflower into a rice-like consistency.
- Cheesecloth or a clean kitchen towel: For squeezing out excess moisture from the cauliflower. This is a crucial step for a crispy crust!
- Large bowl: To mix the cauliflower with the other ingredients.
- Measuring cups and spoons: For accurate ingredient measurements.

Step-by-Step: Making Your Cauliflower Crust
Before You Begin:
Prepare your cookware as needed. Cooking times and results may vary depending on your equipment and ingredients. Handle raw eggs carefully, keep them separate from ready-to-eat ingredients, and wash hands and surfaces after contact.
1. Preheat the Oven
Preheat oven to 425°F (218°C).
Line a baking sheet or pizza stone with parchment to prevent sticking.
2. Rice the Cauliflower
Cut cauliflower into florets and pulse in a food processor until it resembles rice.
If using frozen riced cauliflower, thaw completely and drain well.
3. Cook the Cauliflower
Microwave cauliflower for 5–6 minutes, until soft.
Allow to cool before handling to avoid steam burns.
4. Remove Moisture (Important Step)
Transfer cauliflower to a clean towel or cheesecloth and squeeze firmly.
Remove at least ½–¾ cup of liquid for a crisp crust.
5. Mix the Dough
In a bowl, combine dried cauliflower, mozzarella, Parmesan, egg, garlic powder, oregano, salt, and pepper.
Mix until fully combined into a dough.
6. Shape the Crust
Press dough into a thin, even circle about ¼ inch thick on the prepared baking sheet.
7. Bake the Crust
Bake for 20–25 minutes, or until the center is firm and edges are golden.
Ensure eggs are fully cooked and the crust reaches a safe temperature.
8. Add Toppings & Finish Baking
Return crust to the oven for 8–10 minutes, or until toppings melt and heat through.
Quick Tips for Success
- Squeeze it Dry: This is the most important step for a crispy crust.
- Thin & Even: Spread the dough thinly and evenly for best results.
- Don’t Skip Pre-Bake: This step helps the crust firm up before toppings.
- Don’t Overload: Too many toppings can make your crust soggy.
- For the best texture, let the crust rest for 2–3 minutes before cutting so it stays firm when topped.
Food Safety Notes
- Handle raw eggs carefully and wash hands and surfaces after contact.
- Keep raw egg mixture separate from ready-to-eat foods.
- Do not leave raw mixture or cooked crust at room temperature for more than 2 hours.
- Refrigerate leftovers promptly in an airtight container.
Make Ahead
- Pre-bake crust, cool completely, and refrigerate up to 3 days.
- Freeze pre-baked crust (without toppings) up to 1 month.
- Add toppings and bake until heated through before serving.
Storage
- Store cooled crust or slices in an airtight container in the refrigerator for up to 3 days.
- For best texture, store crust and toppings separately if possible.
Reheating
- Oven: Heat at 425°F (218°C) for 8–10 minutes until hot and crisp.
- Air Fryer: Reheat at 375°F (190°C) for 3–5 minutes.
- Reheat until warmed throughout before serving.
Common Mistakes to Avoid
- Not squeezing out enough moisture
- Overprocessing cauliflower into mush
- Adding too much moisture-rich cheese
- Skipping the pre-bake
- Ignoring steam safety when microwaving
- Overloading toppings, causing sogginess
FAQs About Cauliflower Pizza Crust
Why does cauliflower crust sometimes turn soft?
Soft crust usually comes from leftover moisture. Drying the cauliflower well and baking until golden before adding toppings helps create a firmer base.
Can I use frozen cauliflower?
Yes. Thaw it fully and squeeze it well, as frozen cauliflower tends to release more moisture.
How do I make the crust crispier?
Use a hot oven, pre-bake the crust, and shape it evenly. A pizza stone also helps with browning.
Is cauliflower crust gluten-free?
It’s typically made without wheat ingredients, but always check labels on packaged items if you need to avoid gluten.
Can I prepare the crust ahead?
Yes. Pre-bake the crust and store it in the refrigerator for 2–3 days or freeze for up to a month. Add toppings just before baking.
What toppings work best?
Moderate toppings give the best results. Moisture-heavy veggies like mushrooms or spinach should be lightly cooked before adding to prevent softening the crust.
Conclusion
This cauliflower pizza crust is a dependable option when you want something different from traditional dough. With proper drying and pre-baking, it turns golden and sturdy enough for a wide range of toppings. It’s an easy recipe to return to, especially for weeknight meals or a build-your-own pizza dinner that everyone can personalize.

Crispy Cauliflower Pizza Crust
Ingredients
Method
- Before You Begin:
- Prepare your cookware as needed. Cooking times and results may vary depending on your equipment and ingredients. Handle raw eggs carefully, keep them separate from ready-to-eat foods, and wash hands and surfaces after contact.
- Preheat Oven
- Preheat oven to 425°F (218°C). Line a baking sheet or pizza stone with parchment paper.
- Rice the Cauliflower
- Cut cauliflower into florets and pulse in a food processor until it resembles rice (about 4 cups). If using frozen riced cauliflower, thaw and drain well.
- Cook the Cauliflower
- Microwave riced cauliflower in a large microwave-safe bowl for 5–6 minutes, until softened. Allow to cool to avoid steam burns.
- Remove Moisture (Important)
- Transfer cooled cauliflower to a clean kitchen towel or cheesecloth. Squeeze firmly to remove at least ½–¾ cup liquid.
- Make the Dough
- Mix cauliflower, mozzarella, Parmesan, egg, garlic powder, oregano, salt, and pepper until a dough forms.
- Shape the Crust
- Spread dough on prepared baking sheet into a thin, even circle about ¼ inch thick.
- Bake the Crust
- Bake for 20–25 minutes, or until edges are golden and the center feels firm. Ensure the egg is fully cooked.
- Add Toppings & Finish Baking
- Remove crust from oven. Add desired toppings. Bake an additional 8–10 minutes, or until toppings are heated through and cheese is melted.
Notes
About the Author
Isaac shares easy, family-friendly recipes made with simple ingredients, focusing on clear instructions and reliable results for everyday home cooking.
Related Wellness Resource (Optional)
Some readers also explore general wellness routines alongside balanced meals and regular home cooking. These routines may include hydration, mindful eating, light movement, or smoothie-based nutrition plans.
If you’re interested in learning more about non-medical wellness support options, you can explore additional information here.
(See disclosure page for details.)
Some readers choose to explore general wellness resources unrelated to cooking. This information is provided for reference only.
Additional information about Mitolyn is available here See the disclosure page for details


")
