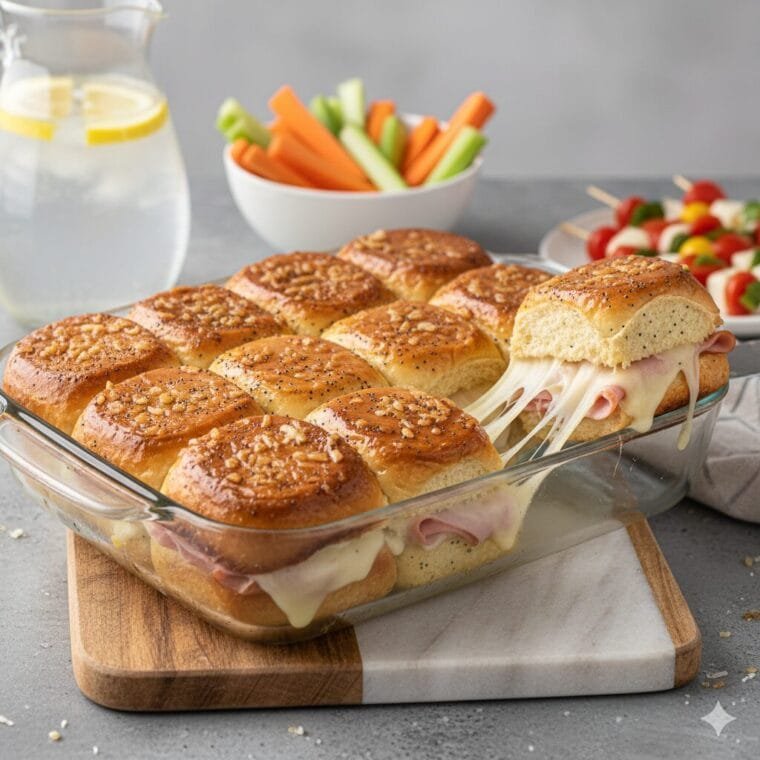
Ham and cheese sliders are one of the most dependable appetizers you can serve for any gathering. Soft Hawaiian rolls, savory ham, melted cheese, and a buttery herb glaze come together in warm, pull-apart sandwiches that disappear as soon as they hit the table. These sliders are simple to assemble, affordable to make for a crowd, and bake in just minutes—perfect for game day, potlucks, family nights, or holiday parties.

This version focuses on balanced flavor, proper layering, and a buttery glaze that gives the sliders their signature golden top. Whether you’re hosting a big event or prepping a quick dinner, these ham and cheese sliders deliver consistent, delicious results every time.
Why You’ll Love This Recipe
Effortless make-ahead party food
Assemble the sliders ahead of time and bake just before serving—ideal for stress-free hosting.
Stretches to feed a crowd
Simple, budget-friendly ingredients make this a smart choice for large gatherings.
Rich, melty, perfectly seasoned flavor
The combination of savory ham, melted cheese, and a buttery Dijon glaze creates the perfect party bite.
Fast baking time
The oven does all the work in under 20 minutes.
Versatile for any event
Great for birthdays, tailgates, brunch, weeknight dinners, or holiday parties.
Ingredients
For the Sliders:
- 1 (12-count) Hawaiian roll package
- ½ lb thinly sliced deli ham (honey, smoked, or black forest)
- 8 slices Swiss or provolone cheese
- ½ cup unsalted butter, melted
- 1 tablespoon Dijon mustard
- 1 teaspoon poppy seeds
- 1 teaspoon dried minced onion
- ½ teaspoon Worcestershire sauce
- Pinch of salt & pepper
Tools You’ll Need
- 9×13-inch baking pan
- Mixing bowl
- Whisk
- Pastry brush
- Sharp knife
- Parchment paper (optional)
How to Make Ham and Cheese Sliders (Step-by-Step)
Before You Begin:
Preheat and prepare your cookware as needed. Cooking times and results may vary depending on your equipment and ingredients.
1. Prep the Rolls
Slice the entire sheet of Hawaiian rolls horizontally. Keep the rolls connected to make filling and cutting easier. Place the bottom half into a baking dish.
2. Layer the Filling Properly
Spread a thin, even layer of Dijon mustard on the bottom half. Add a layer of ham, then cheese, followed by another layer of ham. This helps prevent sogginess and keeps the sliders structured.
3. Make the Butter Glaze
In a small bowl, whisk melted butter, Dijon mustard, poppy seeds, dried minced onion, Worcestershire sauce, and a small pinch of salt and pepper until fully blended.
4. Brush the Tops
Brush the butter glaze generously over the rolls. Make sure to cover the tops evenly so they bake golden and flavorful.
5. Bake Safely
Cover the pan with foil to prevent over-browning.
Bake at 350°F (175°C) for 10 minutes, then remove the foil and bake an additional 5–10 minutes until the cheese is fully melted and the tops are lightly golden.
6. Slice and Serve
Cut along the original roll lines. Serve warm for best texture and flavor.
Food Safety Note:
Keep deli ham refrigerated until assembling. After baking, serve sliders promptly and avoid keeping them at room temperature longer than 2 hours.
How to Serve
Ham and cheese sliders pair perfectly with:
- Potato chips
- Coleslaw
- Fresh fruit platter
- Simple green salad
- Pickles or relish
- Homemade fries
For parties, arrange sliders on a wooden board and garnish with chopped parsley for color.
Food Safety
- Keep deli meat chilled until use
- Refrigerate leftovers promptly
- Reheat until hot throughout before serving again
Storage, Freezing & Reheating
Refrigerate
Store leftovers in an airtight container for up to 3 days.
Reheat
Wrap in foil and warm at 350°F for 10–12 minutes.
Freeze (Unbaked)
Wrap assembled sliders individually and freeze up to 1 month. Thaw overnight before baking.
Make Ahead
- Assemble sliders, cover tightly, and refrigerate up to 24 hours before baking
Common Mistakes to Avoid
- Using too little glaze → The butter mixture adds most of the flavor.
- Skipping the foil → Keeps tops from browning too quickly.
- Overfilling → Too much meat or cheese causes sliding and uneven baking.
- Separating rolls before assembly → Keeping them connected makes layering easier and cleaner.
FAQ – Ham and Cheese Sliders
Can I make these a day ahead?
Yes. Assemble completely, cover tightly, refrigerate, and bake when ready.
What cheese works best?
Swiss and provolone melt smoothly, but cheddar, mozzarella, or pepper jack also work.
Can I use turkey or roast beef?
Absolutely—these sliders adapt well to nearly any deli meat.
Are Hawaiian rolls required?
They’re traditional because of their soft, slightly sweet texture, but any slider roll works.
Can I double the recipe?
Yes—use two pans and rotate them halfway through baking.
Conclusion
Ham and cheese sliders are one of the easiest and most reliable dishes you can make for gatherings. With soft rolls, savory ham, melted cheese, and a golden buttery glaze, they deliver warm, satisfying flavor in every bite. Whether for game day, potlucks, or a quick family dinner, this recipe guarantees an irresistible crowd-pleaser that guests will request again and again.

Ham and Cheese Sliders
Ingredients
Method
- Before You Begin
- Prepare your cookware as needed. Cooking times and results may vary depending on your equipment and ingredients. Keep deli meat refrigerated until ready to use.
- Preheat oven to 350°F (175°C) and place rolls in a baking dish.
- Slice rolls horizontally while keeping them connected.
- Layer ham, cheese, and more ham evenly on the bottom half.
- Place top rolls over filling.
- Whisk melted butter, mustard, poppy seeds, onion, Worcestershire, salt, and pepper.
- Brush glaze evenly over tops.
- Cover with foil and bake 10 minutes.
- Remove foil and bake 5–10 minutes more until cheese is fully melted, tops are golden, and sliders are heated through in the center.
- Slice and serve warm. Refrigerate leftovers within 2 hours.
Notes
- Keep rolls connected and glaze evenly for best results
- Store leftovers refrigerated up to 3 days in an airtight container
- Reheat wrapped in foil at 350°F until warmed through
About the Author
Isaac shares easy, family-friendly recipes made with simple ingredients, focusing on clear instructions and reliable results for everyday home cooking.

")

