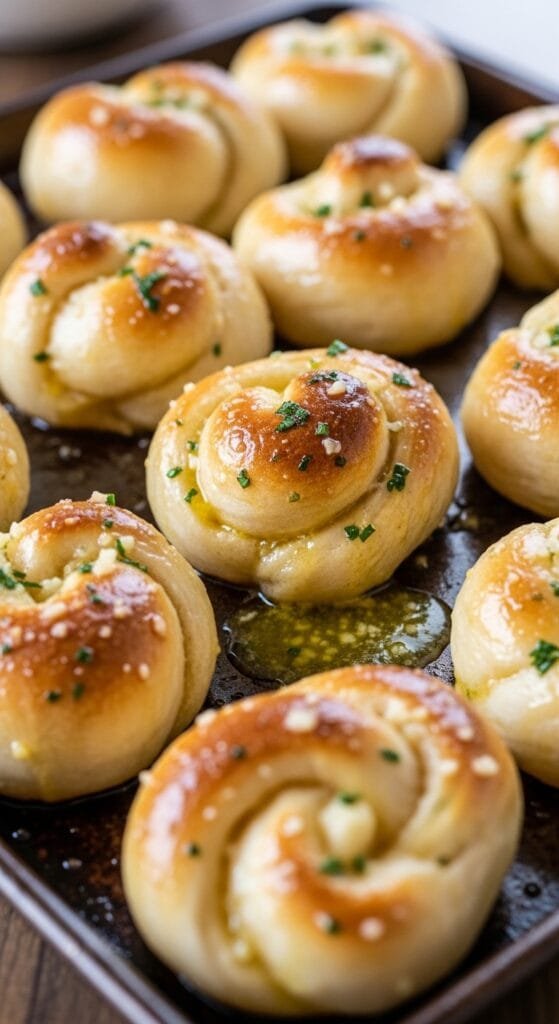
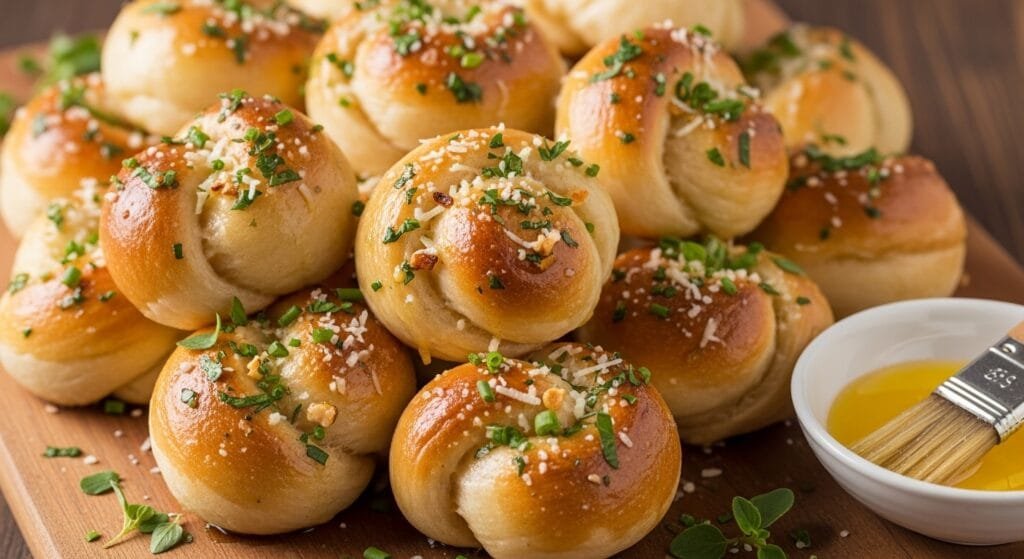
Homemade garlic knots are one of those reliable recipes that fit almost any meal. These knots come out soft, fluffy, and loaded with warm garlic herb butter. The dough is simple, beginner-friendly, and shaped into ropes that bake into golden knots with a tender interior. A finishing brush of garlic butter gives them the classic pizzeria flavor that makes these knots so irresistible.
Whether it’s pizza night, pasta night, a potluck, or a cozy appetizer platter, these garlic knots are easy to make, freeze well, and work with countless meals. This version focuses on simplicity, consistent results, and a clean ingredient list you can rely on.
Why These Garlic Knots Work
- Soft, pillowy dough with great structure
- Two coats of garlic butter for maximum flavor
- Easy shaping method suitable for beginners
- Freezer-friendly for meal prep
- Versatile dough that doubles as pizza dough or breadstick dough
Ingredients
Dough
- 1⅓ cups warm water (100–110°F / 38–43°C)
- 2¼ tsp instant yeast
- 1 tbsp sugar
- 3 tbsp olive oil or melted butter
- 1 tsp salt
- ½ tsp garlic powder
- 3½ cups all-purpose flour (spooned & leveled), plus extra for kneading
Garlic Butter Topping
- 5 tbsp melted unsalted butter
- 3 garlic cloves, minced (or ½ tsp garlic powder)
- 1 tsp Italian seasoning
- ¼ tsp salt
- Optional: grated Parmesan
- Optional: chopped parsley
How to Make Homemade Garlic Knots
Before You Begin
Preheat and prepare your cookware as needed. Cooking times and results may vary depending on your equipment and ingredients.
1. Activate Yeast
Mix warm water, yeast, and sugar. Let stand 5 minutes until lightly foamy.
2. Mix Dough
Add olive oil, salt, garlic powder, and half the flour. Mix briefly. Add remaining flour and mix until a dough forms.
3. Knead
Knead 5 minutes with a dough hook or 5–7 minutes by hand until soft and slightly tacky.
4. First Rise
Place dough in a greased bowl, cover, and let rise 1–2 hours or until doubled.
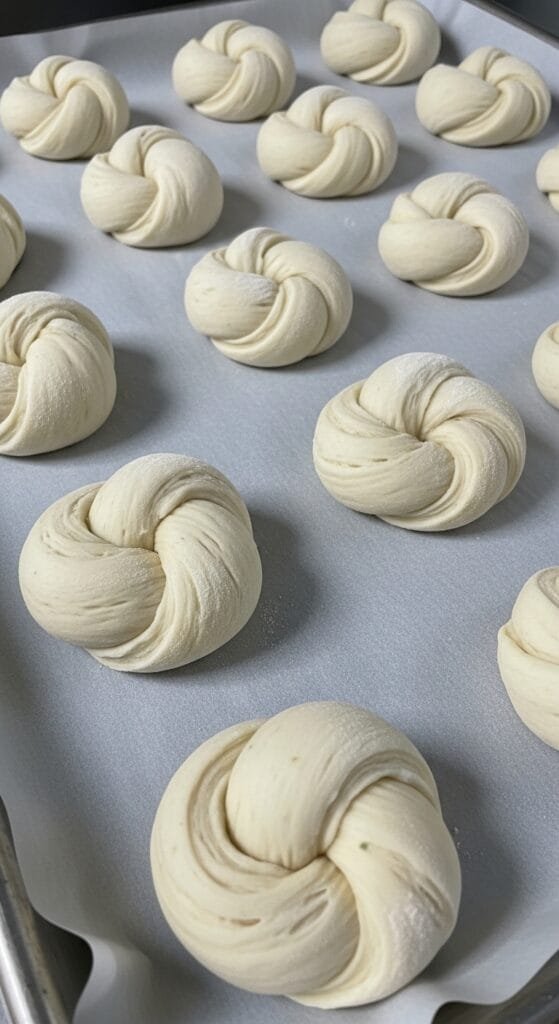
5. Shape Knots
Punch down dough. Shape into a 16-inch log and cut into 16 equal strips. Roll each into an 8-inch rope and tie into a knot.
6. Second Rise
Place knots on lined baking sheets, cover loosely, and rest 30–45 minutes.
7. Garlic Butter
Stir melted butter, garlic, seasoning, and salt.
8. Bake
Bake at 400°F (204°C) for 20–23 minutes until golden, lightly browned, and bottoms are lightly crisp.
9. Finish
Brush warm knots with remaining garlic butter. Add Parmesan or parsley if you like.
Tips for Perfect Garlic Knots
- A slightly tacky dough creates softer knots.
- Avoid adding extra flour unless absolutely needed.
- Brush with butter before and after baking for best flavor.
- Fresh garlic gives stronger flavor than garlic powder.
- For faster rising, place covered dough in a warm (not hot) oven.
Variations
- Cheesy Knots: Add mozzarella or Parmesan.
- Spicy Knots: Add crushed red pepper to the butter.
- Herb Knots: Add basil, thyme, or rosemary.
- Sweet Dessert Knots: Brush with butter + cinnamon sugar and add vanilla glaze.
How to Serve, Store & Reheat
How to Serve
Serve garlic knots with:
- Marinara sauce
- Alfredo sauce
- Pizza
- Italian soups
- Pasta dishes
- Salad plates
Food Safety
- Use water no hotter than 110°F (43°C) to avoid damaging yeast.
- Bake until fully golden and set.
- Refrigerate leftovers within 2 hours.
Make Ahead
- Prepare dough through first rise up to 24 hours ahead and refrigerate. Bring to room temperature before shaping.
Storage
- Store cooled knots in airtight container:
- Room temperature: up to 2 days
- Refrigerator: up to 5 days
- Freezer: up to 3 months
Reheating
- Oven: 300°F (150°C) for 8–10 minutes
- Air fryer: 300°F (150°C) for 3–4 minutes
- Microwave: 10–12 seconds
- Heat until warmed through.
How to Freeze
Baked Knots
Freeze cooled knots up to 3 months. Reheat from frozen. Do not store while warm; allow knots to cool completely first.
Unbaked Knots
Freeze shaped knots on a tray until solid. Thaw and rise 1 hour before baking.
Common Mistakes to Avoid
- Adding too much flour
This makes the dough stiff and dense instead of soft and fluffy. - Over-kneading the dough
Kneading too long develops excess gluten, resulting in tough garlic knots. - Using water that’s too hot
Water above warm (not hot) can weaken or deactivate the yeast. - Skipping the second rise
This step helps the knots bake up light and airy rather than compact. - Under-buttering the knots
Garlic knots get most of their flavor from the butter—brush generously. - Over-baking
Baking too long dries out the knots. Remove once golden, not dark brown.
FAQ – Garlic Knots
1. What kind of yeast works best?
Instant yeast is the easiest since it mixes directly into the dough. Active dry yeast works too but may require a longer rise.
2. How do I know if my dough is ready to shape?
It should feel soft, elastic, and slightly tacky. When pressed gently, it should bounce back slowly.
3. Can I use store-bought pizza dough?
Yes. Store-bought dough is a quick shortcut, though homemade dough gives a softer texture.
4. Why did my dough rise slowly?
Cold kitchens slow yeast activity. Place dough somewhere warm, such as a turned-off oven, to help it rise.
5. Can I freeze the dough?
Yes. Freeze the dough after the first rise. Thaw in the refrigerator overnight and let come to room temp before shaping.
6. Why are my knots tough?
Common causes include too much flour, over-kneading, or over-baking. Stick to measured times and weights.
7. How do I make stronger garlic flavor?
Use fresh minced garlic in the butter and brush twice. You can also add garlic powder directly to the dough.
8. Can I use bread flour?
You can, but it creates chewier knots. All-purpose flour gives the fluffiest texture.
9. Are these knots good for dipping sauces?
Yes. They pair well with marinara, Alfredo, garlic butter, pesto, or ranch.
10. Can I double or halve this recipe?
Yes. Adjust ingredients proportionally, keeping the yeast ratio the same.
Homemade garlic knots are one of those recipes that feel simple but taste unforgettable. With soft, fluffy dough and rich garlic herb butter brushed on twice, these knots bring bakery-level flavor to your kitchen with ingredients you likely already have. They pair with almost any meal, freeze beautifully, and make a great side for pizza nights, pasta dinners, soups, and party platters. Once you shape the first few knots, the process becomes effortless—and the smell of warm garlic butter alone makes the recipe worth making. Whether you’re cooking for your family or hosting friends, these garlic knots deliver comfort, flavor, and a fresh-baked touch that everyone appreciates. Save this recipe for your next cozy dinner or meal prep day!
Homemade Garlic Knots
Ingredients
Method
- Before You Begin
- Preheat and prepare your cookware as needed. Cooking times and results may vary depending on your equipment and ingredients.
- Mix warm water, yeast, and sugar. Rest about 5 minutes until lightly foamy.
- Add oil, salt, garlic powder, and half the flour. Mix briefly.
- Add remaining flour and knead 5 minutes until dough is soft and slightly tacky.
- Place dough in greased bowl, cover, and let rise 1–2 hours until doubled.
- Punch down dough and divide into 16 pieces. Roll each into an 8-inch rope and tie into knots.
- Place on lined baking sheet, cover loosely, and let rest 30–45 minutes.
- Stir butter, garlic, seasoning, and salt.
- Brush knots with butter and bake at 400°F (204°C) for 20–23 minutes until golden and lightly browned.
- Brush warm knots with remaining butter. Add optional toppings and serve.
Notes
About the Author
Isaac shares easy, family-friendly recipes made with simple ingredients, focusing on clear instructions and reliable results for everyday home cooking.
")


")